
With 39 new sets, focals, and pendants just listed yesterday, you shouldn't have any trouble finding something for everyone on your shopping list - including yourself!
Wednesday, November 24, 2010
Black Friday - Free Shipping!
What are you thankful for? I'm thankful for my wonderful family, my incredible customers, and, of course, beads! I want to show my appreciation. After you've finished gobbling up your turkey Thanksgiving Day, you can head over to my Artfire shop and gobble up some beads for FREE SHIPPING! The free shipping offer will start on Wednesday 11/24 and will end on Monday 11/29 and will apply to items purchased in my Artfire shop.
With 39 new sets, focals, and pendants just listed yesterday, you shouldn't have any trouble finding something for everyone on your shopping list - including yourself!
With 39 new sets, focals, and pendants just listed yesterday, you shouldn't have any trouble finding something for everyone on your shopping list - including yourself!

Thursday, November 4, 2010
I've Gotten An Upgrade
Look at what came in the mail today:

It's a lovely new Scorpion torch! The Scorpion is a 13 jet 4-stud surface mix torch designed to work quite effeciently on oxygen concentrators. It works boro and soft glass with ease. It has an inner and outer flame, which means I can use only the inner flame, or I can use the inner and outer flame together to work larger pieces. The inner flame has 5 jets and the outer has 8. This torch is a huge upgrade from my Bobcat which has only 7 jets. What all this means is that I can work hotter, bigger, and faster once I am hooked up!

I've been saving for this torch for a while now. It was being offered at the introductory price and I was about halfway there, but I got a call on Monday from Glass Torch Technologies. They wanted to know if I still wanted a Scorpion at introductory price because the price was going to go up to full retail. I reassured them that I did, and they told me they had them ready to ship out! How could I say no to this face:

So, now I just need to pay for it! I still have nearly one hundred items marked 25% off in my Artfire and Etsy shops! Plus, for a limited time, if you enter the coupon code Scorpion when purchasing from my Artfire shop, you will get FREE SHIPPING on your purchase of two or more items!
Now if you'll excuse me, I have an arthropod to tame.

Friday, October 29, 2010
How Do You Create?
Some time ago I came up with an idea for the Fire Divas called "Ask the Divas." Our fans can submit questions and we will answer them! We recently implemented it and we just received, and answered, a very good question: What is the creative process like? Here is my response to just a fantastic question:
 With soft glass, I let the glass or special elements guide me. I usually think about a particular color of glass or element, like murrini, shards, etc, and end up with a general direction.
With soft glass, I let the glass or special elements guide me. I usually think about a particular color of glass or element, like murrini, shards, etc, and end up with a general direction.Next I sit in front of my glass and select colors that coordinate with my central element. For instance, I've been making a lot of rounds with shards lately, so I select a base color that compliments the color(s) in the shards.
Finally I end up at the torch and go with the flow; I have the idea in mind, and the rest is up to what feels right once the glass is melting in the flame. Even the simplest, most routine bead set changes every time.
Boro, however, is different. Sculptures I study and sketch out down to the last detail beforehand. Implosions I map out in my head before attempting. Boro is an entirely different beast! It's a stiffer glass and interestingly enough is much more structured creatively for me as well.
http://www.artfire.com/modules.php?name=Shop&op=listing&product_id=1789424
Read what some other Divas had to say about their process below!
 From Holly:
 From Rosemarie:
 From Ema:
 Kathleen says:
 And here's Laurie's answer:
Boro, however, is different. Sculptures I study and sketch out down to the last detail beforehand. Implosions I map out in my head before attempting. Boro is an entirely different beast! It's a stiffer glass and interestingly enough is much more structured creatively for me as well.
http://www.artfire.com/modules.php?name=Shop&op=listing&product_id=1789424
Read what some other Divas had to say about their process below!
Lara says:

I rarely can pinpoint where I get my ideas for beads, but my bunny bead is an exception. I started making these beads last year around Easter time. I think they are super cute.
My mom has a Terra Cotta pot with a large Lop Rabbit on the front. Neither of us can remember the artist, but she got the pot at an art's fair in the Seattle area. One day I was thinking about what to make next and I was looking at the pot and decided to try.
First I drew a pattern on paper to get the shapes down, then did some dots on the bead and pushed and pulled the dots into ears, a face, and legs. Tada..... bunny bead.
 From Holly:
 For me, it depends on the bead. If the bead is sculptural, I will print out several images featuring different angles of the object I want to re-create. If I am working on a set, I might spend time pulling different color rods. No matter what I'm making, there is some kind of map in my head of where to go... what kind of glass to layer where in order to get the effect I want. Care has to be given to parts that need more heat or can take more heat vs. those that need fine detail and less heat. It's a constant balancing act. Sometimes it works; sometimes not.
From Rosemarie: Color and shape are very important elements of my work, so I usually decide right away what those are going to be. Sometimes the glass does not do what I want; then I end up with something new. Sometimes the new is good, sometimes not so good.
For this bead, I wanted to represent a dangerous river. I wanted a large surface to work on, so I decided to use the bicone shape.
How did I choose the colors? I wanted water and sky, so that was a pretty easy choice. My water colors were turquoise and cobalt and my sky was a light powder blue. I wanted some white for clouds. I have developed a way to make the webbing spread in a consistent manner, so I decided to use that to show white frothy water. I decided all of this in advance and then proceeded to make the bead.
When that was done, the bead did not look "angry" enough, so I added swirls - which happily looked like whirlpools in the water. I usually melt everything smooth, but once the swirls were on the bead and still raised, I really liked the effect so I decided that the bead was complete.
This happens often - I have a general plan on what something will be, but then modify it once the bead is in progress. Sometimes this happens once the first attempt at the bead is already cooled. Then I have to start the process from the start, modifying what it is that I don't like. http://www.etsy.com/listing/26160332/gray-ivory-and-black-glass-lampwork
Sonja's answer: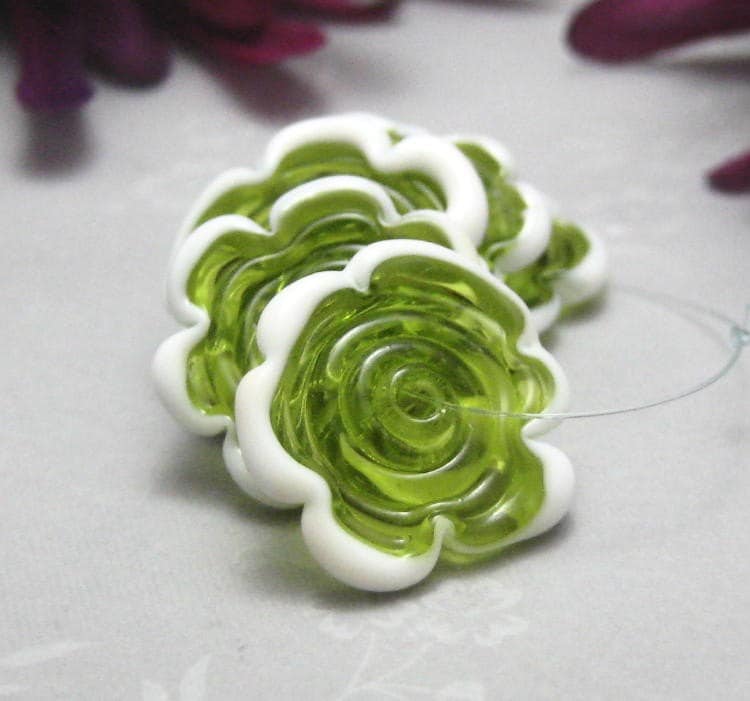
Honestly, for me, I usually start each session at the torch with certain colors in mind and maybe a vague idea of what direction I want to go in (shape, texture, or a certain style). I then decide how I want it to go together, but honestly, many times I will sit down with a certain idea in mind and midway through (or sooner) the bead goes off on a tangent and something else entirely ends up being made.
From Ema:Each time I sit at the torch is different. Sometimes I have an idea of what I want to make; such as being inspired by a beautiful tree I have seen on a walk that I feel compelled to make into a bead. Other days I am inspired by color combinations. I will pull out all the rods in that color scheme and just let the colors take me where they may.
http://www.etsy.com/listing/57350713/kaliptico-wonders-lampwork-focal-bead
http://www.etsy.com/listing/57350713/kaliptico-wonders-lampwork-focal-bead
Kathleen says:I rarely sit at my torch with a pre-conceived idea. Usually it'll be a mood that will hit me, like, I want to make flowers, or I feel like working in certain colors, or I just want to do easy stuff. Occasionally , I feel like challenging myself to step out of my box; using colors I generally don't use and techniques I want to become more familiar with. Ultimately it never plays out the way I think it will. The glass will take over, and like a dance partner, I just follow and let the glass and flame take the lead. Lately, I've been concentrating on flowers. http://www.etsy.com/listing/58878138/copper-canyon-focal-lampwork-bead-sra
Lea says: 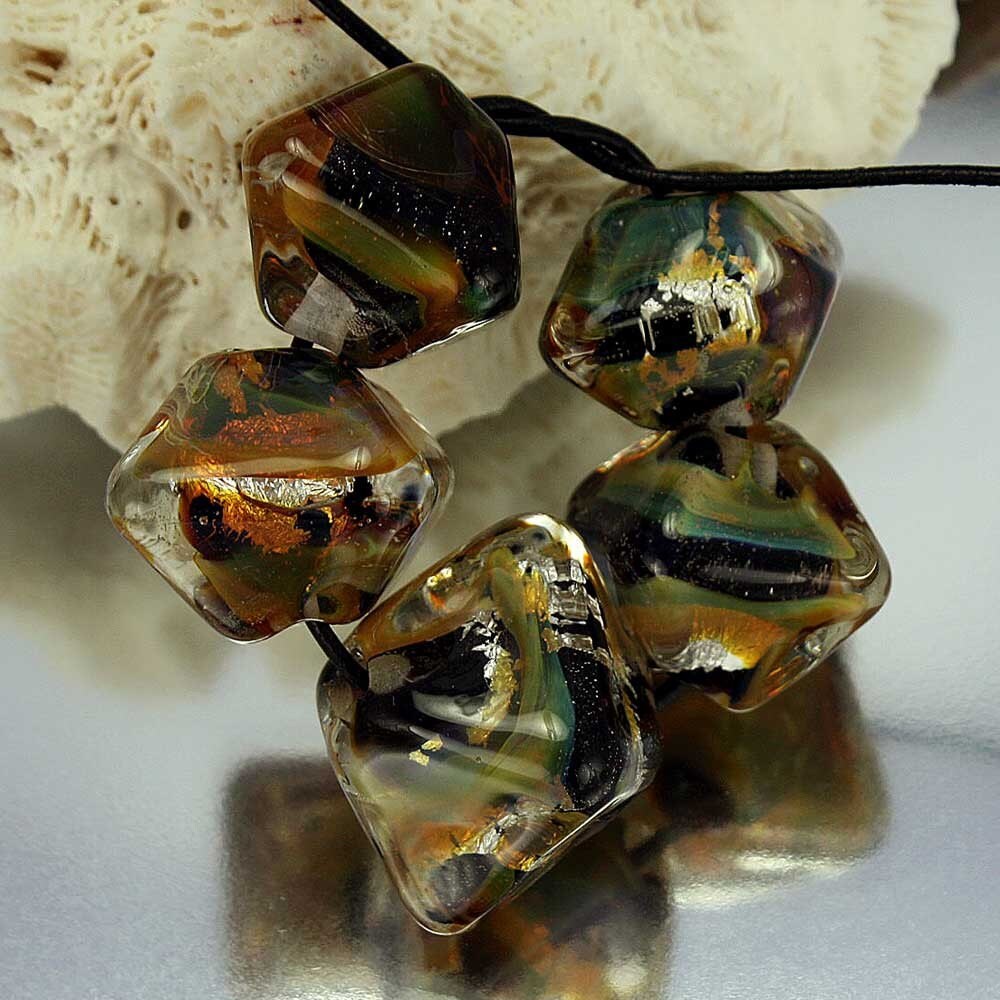
Each session is different for me. Sometimes I start out with certain new color glass rods I want to play with or shards, new technique, etc. & basically just play & see where the session takes me. Lately, or at least the last couple of times I torched, I started out with a list of beads I wanted to make & then left myself some play time at the end. I found it to be a much more productive use of my time. Go figure!
http://www.etsy.com/listing/56968225/lampwork-glass-bead-set-fire-diamonds
http://www.etsy.com/listing/56968225/lampwork-glass-bead-set-fire-diamonds
And here's Laurie's answer:Who knew there were so many different ways to come up with an amazing bead! I use a little of all of these techniques in my beads.
And I find that often one thing leads to another, as was the case with these Christmas Bird earrings. It all started with some basic twirling, a set of paisley earrings for a customer, a red and green fish, and finally these birds arrived on the scene.
Wednesday, October 20, 2010
Fire Divas Monthly Challenges
I am one of three co-managers for a group of lampworkers called the Fire Divas. I've posted stuff on my blog about our group before. Well, one of the jobs I have is the monthly bead challenges. I create themes, accept entries from our members, write up blog posts, set up the polls, and announce the results. To be perfectly honest, I hate entering. I only enter for exposure and to set an example to my fellow members. I almost always come in dead last. In fact, I even stopped voting for myself because I was often my only vote. It was depressing.
This month's challenge was Thanksgiving. I once again had to select an entry. I had a set I made with a unique glass; it's a glass that was only made once and will never be made again. It's one of my favorite colors and is a delicious looking translucent burnt caramel. I bought a few pounds of it as soon as I melted my first rod because I just loved it! This color was the base for my set. To this, I added some incredible Lori and Kim murrini, and to accent the murrini I had chosen three colors of glass and made one single dot of each color on both sides of the beads. I really like this set; I almost kept it for myself.
That was the set I chose to enter, and below is the blog post I typed up for the Fire Divas' blog this morning.
Thanksgiving Challenge Results
We have a winner for the Thanksgiving Challenge! We tallied the votes and the entry you were most thankful for was:
Entry 5 - http://www.teasebeads.artfire.com

Congratulations to our winner!! Now let's take a look at all the other fantastic entries!
Entry 1 - http://ahouston.etsy.com

Entry 2 - http://www.artfire.com/users/LAJewelryDesigns

Entry 3 - http://www.etsy.com/shop/Lutrick

Entry 4 - http://www.artfire.com/users/HollysFollyGlass

Thanks for voting!
----------------------------
I think I earned the right to brag just a bit. :)
Wednesday, August 18, 2010
Looking Ahead
It is so hot. A few days ago it was 100 degrees, and on another day our heat index was 110. August is the hottest month of the year here in North Carolina. We're all stuck in the house because we have no desire to melt into sweaty blobs outside. It is definitely summertime - no doubting that!
However, as an artist, I have to look ahead to the upcoming seasons when I decide what to make. The Fire Divas are holding another Quarterly Jewelry Challenge, and this time I chose "The Holiday Season" as the theme. That means I need to make some holiday beads, pronto!
Why so early? It's only August! Well, the challenge deadline is October 15. That means jewelry designers have to have their creation submitted by that date. The designers need plenty of time to shop for beads, have them shipped, and materialize that work of art.
It's hard to switch gears. I've been doing sets lately (not that I've gotten anything listed). Recently, I made 3 large sets (up to 12 beads) - one set each of pink, gray, and mint green tabs with dots & murrini accents. I also made a cool 14 bead set of clear rounds with icy colored shards. I made some boro seahorses and flower implosions. All my work has been completely summer themed!
I finally sat down and did some brainstorming, though. I now have a list of holiday-themed sets that I plan to start creating just as soon as I can get out to my torch. I'm covering three holidays - Halloween, Thanksgiving, and Christmas. I still find it so strange to generate Christmas ideas in the summer heat!
Of course, the next challenge will be getting this all listed. In addition to what I plan to make, I have a plastic container full of things I need to list. I haven't listed anything all summer! I've marked down all my existing pieces by 25% to help make room for the new items, and school starts soon so that means a quieter house. Quieter house = easier picture taking. I'm getting there!
For info about the Fire Divas Quarterly Jewelry Challenge, please visit:
http://firedivas.blogspot.com/2010/08/fire-divas-quarterly-jewelry-challenge.html
Friday, July 23, 2010
Etsy Felt Left Out
My Etsy shop was feeling pretty left out since the BOGO 33% off sale only included Artfire Items. It kept looking at me woefully, saying, "Why not meeee? Why not meeee?" To which I responded, "Because your too hard to ediiiiit! Because your too hard to ediiiiit!"
My Etsy shop didn't seem to care.
It can be very persistent.
So, finally, I sat down and edited my items, one by one, until they were all done. My Etsy shop is now officially included in my BOGO 33% off sale ("Thank yooooou!" "You're welcooooome!").
BOGO 33% off all items (except tutorials). Discount given as a refund on the item of lesser or equal value after payment is received. There is no limit per order, the sale can end at any time, and the weirdness is sprinkled on for free.
Wednesday, July 14, 2010
Soda/lime vs Borosilicate
Back when I first started lampworking, I had no idea there were different types of glass. In fact, I didn't even know there were different glass manufacturers. All I knew was that I needed something called "Effetre." No one ever told me about COE.
Now I own glass from many different manufacturers - Effetre, Vetrofond, Creation is Messy, Lauscha, Reichenbach, Devardi, Gaffer, and Double Helix (I may be forgetting some!). This doesn't even include all the frit, shards, or murrini makers I've purchased from. It is amazing how far I've come!
Soon after the start of my lampworking career I learned about COE. COE is the coefficient of expansion; glasses have to be the same COE to be compatible. All the glass I was using was COE 104, and it was called soda/lime glass. There are exceptions; for instance, glass with a COE of 96 (such as Reichenbach and Gaffer) can be used sparingly in 104. However, there was another type of glass I learned about, too. It had a COE of 33! It needed a lot of heat, and the pieces were generally bigger; most of what I saw were detailed, complex sculptures, and pendants where the design moved up and into the glass....how did they do that?? This glass was called borosilicate. I was in awe and I looked up to boro workers with revere. I knew that was something I would never do. I couldn't get a torch that big, or have enough heat. I couldn't create things that incredible, or that difficult. After all, I was making tiny 1/2" beads on my starter torch - a hot head.
Things change. I upgraded my torch to a bobcat and learned that on my 5lmp oxycon I could do small boro. That was kind of cool to know...you know, just in case. But it wasn't like I would really do boro. Then, some boro shorts were put up for sale.; I thought I would just get them to try later. Finally I succumbed to my curiosity and sprung for the eyewear - shade 5 Boroscope fit-overs - and dove head-in.
The difference is amazing! The glass takes much more heat, for one thing. I knew this but nonetheless I was very surprised. The glass gets so hot that I can feel the heat on my face; something that never happens with 104. Also, the glass is very stiff. It is harder to get the fluid, liquid-like shape that is so easy (sometimes frustatingly easy!) with 104. There is an advantage, though - that stiffness makes it easier to heat and shape tiny parts without melting down your entire piece. The stiffness also makes implosions a piece of cake.
Borosilicate doesn't shock nearly as easily, making large sculptures possible. Even with my limited oxygen supply I was able to create a 68mm seahorse sculpture with ease. You can put the rods right in the flame with no shattering, and you can make components of your piece then set them aside to use later without the risk of them cracking into bits. The first few times I heated a boro rod, I held my breath, leaned back and turned my face a bit, shoved the tip in the flame and flinched. If I did that with soda/lime, I would have frit all over the floor. It took some getting used to!
So with all these benifits to boro, why use soft glass? There are several reasons. First, the borosolicate pallete is seriously limited. There are a few manufacturers, but none of them have the extensive color lines that the soda/lime manufacturers do. Along those same lines, the soda/lime glasses are, generally, much brighter colors.
Second, soda/lime glass is much cheaper. Sales aside, you can get a pound of standard soda/lime color for $13-15 per pound. Silver glass is expensive (up to $100/lb), but it is not, by any means, a necessity when working 104. Add sales into the mix, and you can buy 104 glass for as little as $2/lb. Borosilicate, on the other hand, is quite expensive. Generally you can expect to pay $10 or so for a quarter pound of glass; a large percentage of boro colors are $50 or more per pound.
The third advantage is the cheaper start-up. If you want to start with 104, you just need a hot head torch ($40). To do boro, though, you'll have to have a surface mix torch (starting at about $200), and an oxycon (starting at about $250).
Finally, another 104 advantage is the fluid motion of the glass. It makes it easier to shape small pieces, wind onto a mandrel, and make smaller details on your work.
I love 104. I've been working it for 3 years and have a very nice collection of glass and "fun stuff" to use. I love having that extensive color pallette and putting details on my beads. There is so much I can do with soda/lime glass! However, I now love borosilicate as well. It fills a gap for me; I can do implosions and sculptures, which are things I tried repeatedly to do with soda/lime and failed. I now feel like I have the best of both worlds, and I have an array of possibilities ahead of me.

Boro Flower Implosion


Now I own glass from many different manufacturers - Effetre, Vetrofond, Creation is Messy, Lauscha, Reichenbach, Devardi, Gaffer, and Double Helix (I may be forgetting some!). This doesn't even include all the frit, shards, or murrini makers I've purchased from. It is amazing how far I've come!
Soon after the start of my lampworking career I learned about COE. COE is the coefficient of expansion; glasses have to be the same COE to be compatible. All the glass I was using was COE 104, and it was called soda/lime glass. There are exceptions; for instance, glass with a COE of 96 (such as Reichenbach and Gaffer) can be used sparingly in 104. However, there was another type of glass I learned about, too. It had a COE of 33! It needed a lot of heat, and the pieces were generally bigger; most of what I saw were detailed, complex sculptures, and pendants where the design moved up and into the glass....how did they do that?? This glass was called borosilicate. I was in awe and I looked up to boro workers with revere. I knew that was something I would never do. I couldn't get a torch that big, or have enough heat. I couldn't create things that incredible, or that difficult. After all, I was making tiny 1/2" beads on my starter torch - a hot head.
Things change. I upgraded my torch to a bobcat and learned that on my 5lmp oxycon I could do small boro. That was kind of cool to know...you know, just in case. But it wasn't like I would really do boro. Then, some boro shorts were put up for sale.; I thought I would just get them to try later. Finally I succumbed to my curiosity and sprung for the eyewear - shade 5 Boroscope fit-overs - and dove head-in.
The difference is amazing! The glass takes much more heat, for one thing. I knew this but nonetheless I was very surprised. The glass gets so hot that I can feel the heat on my face; something that never happens with 104. Also, the glass is very stiff. It is harder to get the fluid, liquid-like shape that is so easy (sometimes frustatingly easy!) with 104. There is an advantage, though - that stiffness makes it easier to heat and shape tiny parts without melting down your entire piece. The stiffness also makes implosions a piece of cake.
Borosilicate doesn't shock nearly as easily, making large sculptures possible. Even with my limited oxygen supply I was able to create a 68mm seahorse sculpture with ease. You can put the rods right in the flame with no shattering, and you can make components of your piece then set them aside to use later without the risk of them cracking into bits. The first few times I heated a boro rod, I held my breath, leaned back and turned my face a bit, shoved the tip in the flame and flinched. If I did that with soda/lime, I would have frit all over the floor. It took some getting used to!
So with all these benifits to boro, why use soft glass? There are several reasons. First, the borosolicate pallete is seriously limited. There are a few manufacturers, but none of them have the extensive color lines that the soda/lime manufacturers do. Along those same lines, the soda/lime glasses are, generally, much brighter colors.
Second, soda/lime glass is much cheaper. Sales aside, you can get a pound of standard soda/lime color for $13-15 per pound. Silver glass is expensive (up to $100/lb), but it is not, by any means, a necessity when working 104. Add sales into the mix, and you can buy 104 glass for as little as $2/lb. Borosilicate, on the other hand, is quite expensive. Generally you can expect to pay $10 or so for a quarter pound of glass; a large percentage of boro colors are $50 or more per pound.
The third advantage is the cheaper start-up. If you want to start with 104, you just need a hot head torch ($40). To do boro, though, you'll have to have a surface mix torch (starting at about $200), and an oxycon (starting at about $250).
Finally, another 104 advantage is the fluid motion of the glass. It makes it easier to shape small pieces, wind onto a mandrel, and make smaller details on your work.
I love 104. I've been working it for 3 years and have a very nice collection of glass and "fun stuff" to use. I love having that extensive color pallette and putting details on my beads. There is so much I can do with soda/lime glass! However, I now love borosilicate as well. It fills a gap for me; I can do implosions and sculptures, which are things I tried repeatedly to do with soda/lime and failed. I now feel like I have the best of both worlds, and I have an array of possibilities ahead of me.
Boro Seahorse Sculpture

Boro Flower Implosion

Soda/lime Copper Mesh Focal

Tuesday, July 6, 2010
Wednesday, June 30, 2010
Fun in the Sun
Spring used to be my favorite season. Lately, however, summer is taking its place. One of the main reasons for this is the fact that my oldest daughter is out of school. Come fall, I'll have a kid in first grade and another beginning his educational career in preschool - a nearly empty house! For now, though, I have all thee babies home with me every day.
We've been doing lots to stay busy. They love the little kiddie pool, and we sectioned of a part of our back yard that we now call "The Playground." In addition to our pool and playground days, we have "Craft Day" which is my favorite part of the week. We went to A.C. Moore's, Michael's, Dollar Tree, and Wal-Mart and stocked up on all those fun things kids like to create with, like foam stickers, color-by-number, perler beads, and more. Every Wednesday they get to pick one craft project and we spend the morning creating works of art to show Daddy when he gets home. My oldest daughter is turning six in August, and she is at that fun girly age, so once a week we do our nails; of course, my son and youngest daughter have to join in and get their fingernails and toenails filed too! Then we have doctor appointments, eye exams, hearing tests, and best of all, mini vacations to keep us going all summer long.
I'm having a great time, and cherishing the days I get to spend with my kids at this young and innocent age. What does this mean for my shops, though? Well, I'm getting in torch time whenever I can, so I have a growing collection of new beauties to list. When the school season begins again and I have that interesting new quiet time, I'll be able to photograph and list my sparkly creations. Don't worry, though, I still have many beads for sale in my shops!
To leave you all with a little teaser, I'll just say that right now I am having tons of fun with fine silver, cubic zironias, and antique keys, and I have many ideas in mind for beads to come.
Monday, June 21, 2010
My Studio - Part 6
This post is the conclusion of a series of blog postings beginning here. At the end of the last post, I had nearly completed my studio.
After I moved all my things over, we hooked up my gas line and checked it for leaks. Then we tested my ventilation. Everything was working perfectly. The only thing left to do inside the studio was set up my glass storage. Sorting and organizing 175lbs of glass seemed like quite an obstacle.
I searched the indispensable lampworketc.com for storage ideas. Finally, inspiration struck. A couple years ago we had purchased a closet organizer from Lowe's. It was 31" high by 12" wide by 12" deep - the perfect size! We went there and bought four of the units, brought them home, and assembled them. Then we stacked 5" lengths of pvc into the units. It worked wonderfully. I spent an entire day sorting and organizing my glass into the pvc, and spread out my frit on top.

The next day I got to try it out. I spent 3.5 hours at the torch - my longest session ever! The glass storage worked perfectly and I had a wonderful time. Being in my studio was amazing. The ventilation meant no painful bulky respirator on my face. All my tools were at my fingertips. I didn't feel all gross, dusty, and dirty like I did in the garage. Here are some of the beads I made:
We still have to paint the exterior of the studio, so it isn't technically finished. However, it is totally torchable and I know that I will spend countless happy hours inside the clean, creativity inducing environment. I couldn't be happier.
After I moved all my things over, we hooked up my gas line and checked it for leaks. Then we tested my ventilation. Everything was working perfectly. The only thing left to do inside the studio was set up my glass storage. Sorting and organizing 175lbs of glass seemed like quite an obstacle.
I searched the indispensable lampworketc.com for storage ideas. Finally, inspiration struck. A couple years ago we had purchased a closet organizer from Lowe's. It was 31" high by 12" wide by 12" deep - the perfect size! We went there and bought four of the units, brought them home, and assembled them. Then we stacked 5" lengths of pvc into the units. It worked wonderfully. I spent an entire day sorting and organizing my glass into the pvc, and spread out my frit on top.

The next day I got to try it out. I spent 3.5 hours at the torch - my longest session ever! The glass storage worked perfectly and I had a wonderful time. Being in my studio was amazing. The ventilation meant no painful bulky respirator on my face. All my tools were at my fingertips. I didn't feel all gross, dusty, and dirty like I did in the garage. Here are some of the beads I made:
 |  |  |
 |  |
We still have to paint the exterior of the studio, so it isn't technically finished. However, it is totally torchable and I know that I will spend countless happy hours inside the clean, creativity inducing environment. I couldn't be happier.
Thursday, June 17, 2010
My Studio - Part 5
Click here to go back to part 1. When I ended, the panels had just gone up over the insulation in my studio. See more construction pictures below!
My 8' tandem four-bulb cold-start light:

My husband and I were finally able to get in there and do some work. First, we tiled the work table and the wall around it (the butterflies I stenciled didn't survive the grouting later). We got the white tiles on clearance at Lowe's for only $0.08 each!


The floor was next (tiles on sale for only $0.57 each at Lowe's):

Then came the paint on the walls, piping in the gas through the wall, the grout around all the tiles, and duct work. We're not so sure about the ducting yet. We still have to test it. After all that, of course, I couldn't wait to start moving stuff over:

Next I moved over the rest of my stuff and got it organized enough for the time being:


Read the conclusion of my studio next time.
Tuesday, June 8, 2010
BOGO Artfire Sale!
We're going on vacation! We are leaving for a week to celebrate our 10th wedding anniversary. I want you to celebrate, too! Instead of closing my shop, I decided to offer a BOGO 33% off* sale in my Artfire shop! This is ONLY available at my Artfire shop and will start 6-9 and end 6-16. The catch? You'll have to wait until I get back from vacation for me to ship your purchase on 6-17.
You can find these and more in my shop:
 Warm My Heart
 Flame
Flame
 Infinity
 Smoke in the Window
*Second item of equal or lesser value. Excludes tutorials. Discount will be given as refund after payment is received.
 Warm My Heart
 Flame
Flame Infinity
 Smoke in the Window
*Second item of equal or lesser value. Excludes tutorials. Discount will be given as refund after payment is received.
Monday, June 7, 2010
My Studio - Part 4
If you haven't read parts 1, 2, or 3, you're going to be pretty lost. You can go back and start with part 1 here. At the end of part 3, I just tucked myself in for a long winter's nap. You can read what happened next by reading on below.
I did a lot of reading that winter. The more I read about ventilation and safety the more I realized I was not in a safe torch environment. We bought three box fans to help circulate the air, and I bought a respirator. It wasn't a solution, but it helped. We talked about setting up a studio. We would have to buy a building and customize it to meet my needs. The problem was, we were trying to sell our house. It didn't make sense to spend all that money on a studio when we were going to be moving. We put the house on the market before our third was born, but it didn't sell, so we took it off right before she was born. After a few months we put the house back on the market, and then off again because school had started, and then on again, and off again... You get the idea.
The winters were getting to me. Last winter I had to stop lampworking in November and couldn't start again until mid-April because it was so cold. I'd had enough. I decided there was no point in waiting. We haven't sold the house and had no idea if we ever would. I was working in unsafe conditions, I couldn't see the frit, shards, or other fun things I had to use in my beads because it was all stacked in piles, and I couldn't use any of my 175lbs of glass because it was piled into plastic storage containers. I was working with shorts, and that was on the few occasions I could even work at all. I gave my every hour to my family. I took care of everything when my husband went out of town every week. I couldn't even go to the bathroom alone. I had no time for me. It had to stop.
Two weeks later we started building my studio.
We bought a building kit from Home Depot and my dad put it together with his helper. They did a lot of extra reinforcing to make it super sturdy.
The floor framing:

Back wall is up:

Sides are up, and roof framing is done:
 Shingled!

My ventilation system in the works. It's a furnace fan given to me for free by my Heating & Air neighbor:

Outside view:

The fan boxed in to create stronger suction:

The walls are insulted and paneled to keep me toasty in the winter. Panels going up:

The studio construction continues in part 5!
I did a lot of reading that winter. The more I read about ventilation and safety the more I realized I was not in a safe torch environment. We bought three box fans to help circulate the air, and I bought a respirator. It wasn't a solution, but it helped. We talked about setting up a studio. We would have to buy a building and customize it to meet my needs. The problem was, we were trying to sell our house. It didn't make sense to spend all that money on a studio when we were going to be moving. We put the house on the market before our third was born, but it didn't sell, so we took it off right before she was born. After a few months we put the house back on the market, and then off again because school had started, and then on again, and off again... You get the idea.
The winters were getting to me. Last winter I had to stop lampworking in November and couldn't start again until mid-April because it was so cold. I'd had enough. I decided there was no point in waiting. We haven't sold the house and had no idea if we ever would. I was working in unsafe conditions, I couldn't see the frit, shards, or other fun things I had to use in my beads because it was all stacked in piles, and I couldn't use any of my 175lbs of glass because it was piled into plastic storage containers. I was working with shorts, and that was on the few occasions I could even work at all. I gave my every hour to my family. I took care of everything when my husband went out of town every week. I couldn't even go to the bathroom alone. I had no time for me. It had to stop.
Two weeks later we started building my studio.
We bought a building kit from Home Depot and my dad put it together with his helper. They did a lot of extra reinforcing to make it super sturdy.
The floor framing:

Back wall is up:

Sides are up, and roof framing is done:
 Shingled!
My ventilation system in the works. It's a furnace fan given to me for free by my Heating & Air neighbor:

Outside view:

The fan boxed in to create stronger suction:

The walls are insulted and paneled to keep me toasty in the winter. Panels going up:

The studio construction continues in part 5!
Friday, June 4, 2010
Fabulous Friday Weekly Promo Sale!
This week's item is only going to be on sale until Wednesday evening. That's because my wonderful husband and I are leaving Thursday for a week-long celebration of our 10th anniversary!! We're going to be spending some time on the beach, so in honor of our trip, I've chosen this bead for the Weekly Promo Sale:

Subscribe to:
Posts (Atom)